pgp4/26/2016
Assignment Website Creation-Dreamweaver CS on Mac
Windows Version Here
Before you begin:
These instructions show you how to create and maintain a website using a Mac running OS X and Dreamweaver CS for Professor Paulson's MIS362 class.
For this project you must have Dreamweaver installed on your computer.
To access Dreamweaver you must be logged onto the WSU network.
From off-campus you must first establish a VPN connection.
Each time you publish your files, you must first mount the network drive. (See Step 1.f.)
Browser note- Creating and viewing your assignment web site will work best if you use FireFox as your web browser. Safari does not have the same functionality and will cause problems, especially when it does not allow you to save graphic images from a web page. (this is subject to change as browsers change.)
Networking note- you will need to use Finder to establish a network connection to your web folders before you can publish your web site using Dreamweaver.
Note: Proficiency with Adobe Dreamweaver is a valuable skill. Feel free to make use of the Lynda.com tutorials or the W3Schools web site to improve your web design skills.
Grading criteria:
This assignment is worth 100 points, and is graded
based on the following criteria.
Grading is done only once, there is no awarding of points past the due date.
You are expected and required to have your web site working correctly during the entire semester.
1. (20) Assignment web site home page url submitted to database correctly using form
in step 17.b.
2. (20) Web site url of the correct format: <YearTerm+CourseIdentifier>/<UserName>
3. (5) Student's Name at top of Assignment template
4. (15) Feedback email address url with correct format, such as: mailto:<UserName>@winona.edu?subject=MIS362AssignmentFeedback&cc=ppaulson@winona.edu
5. (10) Confirming email received by professor-per step 14.g.
6. (20) First assignment hyperlink correctly formed, with correct
folder structure such as:
'http://classes.winona.edu/<YearTerm+CourseIdentifier>/<UserName>/Assignment01/Assignmentxx.htm'
- per step 11
7. (10) Miscellaneous issues-which means not following items listed in these
instructions, poor grammar or spelling.
Make sure to refer to the Sample Home Page in order to see what a completed web site will look like when you finish this project.
8. You will continue to lose points from this and individual assignments if you do not link assignments correctly, or do other things that prevent me from being able to grade your assignment.
In effect, at the end of the semester you can end up with zero points for this assignment.
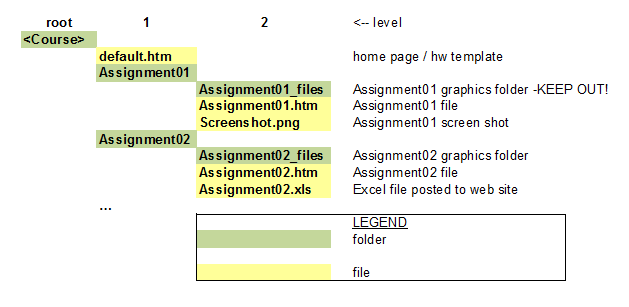
Figure 1 : You will create
one web site for each class you take with Professor Paulson.
Your web site’s root folder is <Course> and
contains your web site home page, default.html
Each assignment will
be a “subfolder” of this root folder.
Graphics files and screen shots are saved in the "Assignmentxx_files" folder.
Your folder structure must look like this:
Preliminaries- To Customize These Instructions
For Your Web Site Complete The Following Steps:
- Replace <SemesterYear> with current semester and year, e.g. Summer2016
- Replace <Course> with the course, e.g. MIS362
- Replace <Section> with the appropriate course section, e.g. 01
- Replace <YourName> with your name, e.g. Joanne Smith
- Replace <UserName> with your WSU network username, e.g.jrstudent2134
- Replace <CourseIdentifier> with the six digit course ID, e.g. 000171
- Replace <YearTerm> with the current academic year identifier. Academic year starts in summer (1) and includes fall (3) and spring (5).
Current YearTerm is 20171 (Summer2016)
- Do not use spaces or non standard characters in your folder or file names! Only use a-Z,
0-9 and ‘_’ (underscore) Why not? Bookmark example!
- (does not apply)
- You must have a WSU username and password, be registered for the class and have an Internet connection
to complete these steps.
- Creating Your Assignment Website – first you need
to create your site
In Dreamweaver, a site consists of two parts: a collection of files and folders on a
local computer (the local site),
and a remote web server where
you upload the local files and folders to so that the professor can view them
(the remote server).
- Open Dreamweaver. You will see panels on the
right and your main workspace on the left.
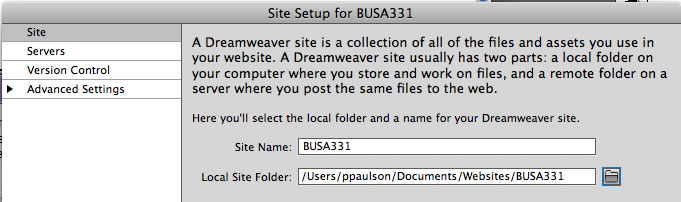
- Site>New Site... A dialog box
will open.
- In the left column click on 'Site'.
- On the right side of screen - in Site Name type in <Course>.
- In Local Site Folder click on the folder icon on the right side and create the folder in /Users/<username>/Documents/Websites/<Course>
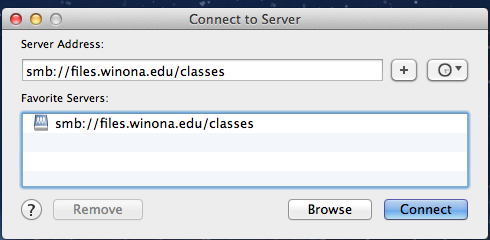
- From the Finder menu choose Go>Connect to Server, and make sure you can navigate to your username folder which is found in smb://files.winona.edu/classes/<SemesterYear><CourseIdentifier>/ (you must do this EVERY time you want to publish your website)
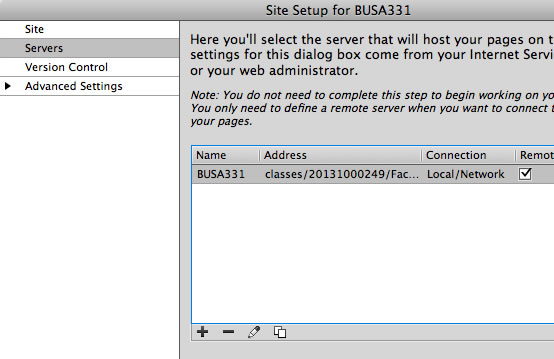
- In Dreamweaver on the left side of screen click on Servers, then click the + sign in the bottom center of the dialog box.
- In the Server Name field type in <Course>
- In the Connect using field choose Local/Network.
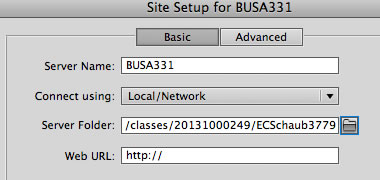
- In the Server folder browse to //volumes/classes/<YearTerm><CourseIdentifier>/<username>
Note: you MUST click the folder icon on the right side and browse to the path below, otherwise Dreamweaver may not connect to the remote server correctly.
| Course |
Days |
Time |
//volumes/classes/<Year/term + CourseID>/ <username> |
| |
|
|
|
MIS362 |
M-F |
any |
//volumes/classes/20171000171/<username> |
- Click
on OK and on the next screen click on DONE.
- You will see your site in the Files Panel folder on
the right side of the screen.
- Choose Dreamweaver>Preferences... and put a check mark in "Save files before putting"
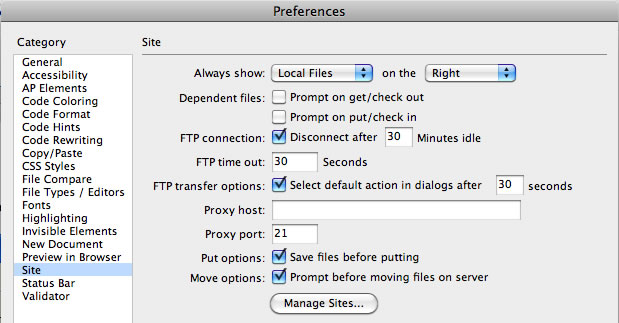
- Click OK to close the dialog box.
- You have your site setup – now you will create
the folders and pages that make the actual site.
- Create Folder Structure
- Right click root folder (<Course>), select
New>Folder.
- Name the folder ‘Assignment01’. Press Enter Key.
- Repeat above step and add Assignment02, Assignment03….one for
each assignment.
i. Assignment01,
Assignment02, Assignment03… are referred to as sub folders.
- Minimize Dreamweaver.
- Download Home Page File
- Locate your course in the table below.
Viewing these instructions using FireFox (not Safari!) as your browser, click the appropriate hyperlink in the 'Template' column.
From the menu choose File>Save Page As...'
Save As: 'default.html' in: /Users/ppaulson/Documents/Websites/<Course> Example: /Users/ppaulson/Documents/Websites/<Course>
Make sure the 'Format' is set to 'Web page, complete
If you are in more than one course, repeat these steps for each course.
- Go back to Dreamweaver (click on icon in Taskbar).
- On the right you should see your default.html under
your course in the folder tree.
i. Press
Fn + F5 to REFRESH – default.html should be there.
- Set up the Attendance Page (not required for Summer 2016)
- In your browser, from the menu click File>Save As... and save as 'Attendance.htm'
Make sure the 'Save As Type' is set to 'Webpage, complete (*.htm ; *.html)'
BUSA376 Attendance |
|
MIS362 Attendance |
|
- Save in /Users/<Username>/Dcouments/Websites/<Course>
If you are in more than one course with Professor Paulson, repeat these steps for each course.
- Go back to Dreamweaver (click on icon in Taskbar). Double click
on 'attendance.htm' so that it opens.
- Select the 'First Name' TextField control, and in the properties dialog
box on the bottom of the screen, enter your first name in the 'Init val'
field
- Repeat step 4.d. for your Last Name and SID. Note- the SID for
this class is a set of alphanumeric character you choose for your convenience in checking on your assignment, ICE and attendance submissions. Do not use anything
important for your course SID, it is not securely stored. It is
suggested that you use the same SID for Attendance, assignments, ICE and
submitting your url. If you are in more than one course with Professor
Paulson, you can use the same SID in all of them. Using the same
SID in all courses will make things easier for you.
- Select the 'Class' ListMenu control, and in the properties dialog box,
select the appropriate class in the 'Initially selected' field.
- Repeat step 4.f. in order to select your section. Save
the attendance.htm file.
- Create a hyperlink to this file on your <Course> home page in
the space provided for this purpose. Do this by opening default.htm,
select 'Attendance', in the 'Link' field of the properties panel browse
or drag the cross hairs to the file attendance.htm Make
sure to save default.htm
- Configure Your Homepage
- Open default.html. (Double-click on it in the FILES
Local View Panel)
- On first line change “Your Name” to <YourName>.
- Either in the Title field under the menu, or right-click on
screen and choose Page Properties and Title/Encoding.
- Change Title to “YourName <Course> Assignment Web
Site” and click on OK.
- Save the file.
- Create Assignment Feedback E-mail Hyperlink
- Select “Email to YourWebMailAccount” and change this text to "Email to YourName"
- In the Properties panel 'Link' box replace 'username' with your WSU network/email username.
- Your email hyperlink will have
the following format.
mailto:UserName@winona.edu?subject=MISxxxAssignmentFeedback&cc=ppaulson@winona.edu
NOTES:
UserName is YOUR WSU network username
After 'subject=' the course prefix will either be 'MIS' or 'BUSA'
'xxx' is the course number, like '376' or '362'
You must format the subject using the wording EXACTLY as shown above, no
spaces are allowed
- Select File>Save and save your work.
- Saving Assignments
- Open your browser.
- Browse to <Course> Syllabus, such as
http://course1.winona.edu/ppaulson<SemesterYear>/<Course>/default.html.
IMPORTANT: DO NOT right click the hyperlink and choose Save Target As... because this will not save any graphic images on the page
- Click on the appropriate assignment so that the page displays in your browser.
- Choose File>Save Page As.... (FireFox) or File>Save As... (Safari)
- Navigate to your local web site assignment folder, such as /Users/<Username>/Documents/Websites/BUSA376/Assignment01 or appropriate assignment folder.
- Save as File Name: Assignment01.htm (or appropriate Assignmentxx.htm)
- Make sure Save as type: is set to WebPage, complete (*.htm; *.html)
- Repeat these steps to save the remaining assignments. Make
sure to put Assignment02.htm into folder /Users/ppaulson/Documents/Websites/<Course>/Assignment02,
and put Assignmentxx.htm into folder /Users/<Username>/Documents/Websites/<Course>/Assignmentxx
- If you are in more than one course with Professor Paulson, you must do this for each assignment for each course.
- Finding Assignments
- Open Dreamweaver.
- Expand folder list under /Assignment01/
- Press Fn + F5 to refresh.
- Double click Assignment01.htm.
- The assignment to be completed will open.
- Other assignments that have been saved will be found under the
appropriate folder, i.e. Assignment02.htm will be under the folder /Assignment02/
- Completing Assignments
- You will fill
in your answer in the 'Init val’ field located below in the Properties
Panel (if Properties Panel on the bottom of screen does not show up
press Fn + Command+F3). Click
on white field beside ‘First Name’. ‘Name’ field will have ‘FirstName’ in
it – Leave this alone. Fill in ‘Initial Val’ white
field with your first name and press 'Enter'.
- ‘Last Name’ , ‘SID’ and other
TextField boxes (including questions in blue text) are filled out the same way. Do not modify any TextField
name, which is on the left end of the Properties Panel under the 'TextField'
label. Only
place your text in the ‘Initial
Val’ field.
- Also select the 'Section' and 'Assignment' ListMenu
controls and choose the correct value in the 'Initially selected' control. If there is only one section the section number will not be editable.
- For questions with black text click on the answer block
and type in the answer. You will fill out the rest of your Assignment
that contains questions with black text this way.
- For questions that require you to link a file within
your assignment:
- First complete the assignment using Excel, Access, VB....
- Save the file with the required file name.
- Place a copy of this file in the folder for that assignment-see Figure
1 and note the location of the Assignment02.xls file in MIS312
- Working in Dreamweaver, within the assignment .htm file, select the
text where you are instructed to place the hyperlink
- Select Insert>Hyperlink from the menu, browse to the folder containing
the file from step 3.
- Click on this file, then click OK.
- Make sure the hyperlink (blue text) appears, if not, try again.
- Make sure to save your work frequently.
- When you are finished go to File>Save to save your
work.
- Adding Screen Shots To Assignments
If you are asked for a screen shot remember the following
tips
- Pressing the Shift + Command + 3 buttons copies all contents of your
screen/monitor to the clipboard.
- Pressing Shift + Command + 4 produces a crosshairs cursor that allows you to select the contents to copy to the clipboard.
- Place the cursor in your Dreamweaver document where you want the screen shot to appear.
- Choose Command + V and the screen shot will appear.
- Choose
File / Save. Navigate to your website local files and choose the appropriate assignment folder to save to. Choose
an appropriate file name (example: Assignment1Q1Graphic). Choose
.png as file type. Click on Save.
- Updating Home Page Hyperlinks
- These steps need to be done each time an
assignment is completed.
- Open default.html in Dreamweaver.
- Select “Assignment01’ in the “Due Assignments’ column. (Note: some assignments do not require hyperlinks, they will be so noted on the homepage.)
- Select Insert>Hyperlink.
- At the right of ‘Link:’ you will see a
folder. Click on the folder.
- ‘Look in’ box should now show “<Course>”
- Open the ‘Assignment01” folder by double-clicking
it.
- Select ‘Assignment01.htm’ and click OK.
- Save your work.
- You will do the same procedure in order to link the text ‘Assignment02’ on
your home page to the file Assignment02.htm and the text 'Assignmentxx' on your home page to the file Assignmentxx.htm … as needed.
- Local Website Check
- Open Finder.
- Navigate to /Users/<Username>/Documents/Websites/<Course>/default.html
- Double-click on ‘Default.html’ and Firefox will open and display your ‘homepage’.
- Remember Fn + F5 to refresh.
- On default.html, move cursor over a hyperlink. In the lower left corner of the screen the hyperlink will appear with a format like: "file:///Users/<UserName>/Documents/Websites/MIS362/Assignment01/MIS362Assignment01.html"
- Click the hyperlink to display the page.
- Your page opens and is displayed in FireFox.
- Website Publishing
- Go back to Dreamweaver – make sure your web site
is displayed.
- If you are opening Dreamweaver and your web is not
open- you will find your web at Site>Manage Sites>. Click on
your site’s name and then click on Done. Your files will appear
on the right.
- To publish, click on Site Name (on the left end of the Files Panel) and then click on the blue Arrow pointing up (4th icon from left in menu above the file structure).
- “Are you sure you wish to put the entire
site” – Click on OK. (Your username and password have
already been entered when you setup your remote info.)
- You will see a dialog box that lists the files being
sent to the studentwebs server and then a confirmation message.
- Internet Website
Check
Open FireFox and navigate to: http://classes.winona.edu/<YearTerm + CourseID>/<UserName>/
- Your ‘default.html’ web page should display.
- Verify that each Assignment hyperlink works correctly,
i.e. displays the proper page on your web site. If not, you must
return to Dreamweaver and correct your hyperlinks.
- You must check your email hyperlink for proper operation by clicking on it while viewing it in FireFox.
- You are strongly advised to use Outlook for your email program. It will be autoconfigured when you start it up while you are logged onto the WSU network.
- If the email hyperlink does not work correctly, that
is, does not open Outlook with an email addressed to your
webmail account, with a carbon copy (cc:) to my email account, and the
proper subject line-then go back to step 6 and review and fix any problems.
- When satisfied that your web site is correct, and your email hyperlink is correctly formatted, click on the email hyperlink. Outlook should start up and create a new email that is addressed to you, with a cc: to me.
- In the body of the email type "I have finished my Project 1 web site and everything appears to work OK."
- Press the send button.
- Verify that you have successfully received this email in your WSU email account.
- Do not worry if you send this email several times.
- Realize that the copy of this email is your proof of completing this assignment on time. If it does not work correctly, or a copy is not sent to me, you have not proven that your assignment is complete.
- Each time you do an assignment, make sure to check for proper operation of the hyperlinks on your web site home page (default.html), and that your assignment and all the screen shots are functioning properly. Remember that if you make any changes to a assignment or screen shot, you must republish those files. Then you must make sure to recheck the web site, using FireFox or another browser. Be aware that you may need to press the Ctrl + F5/ or Ctrl + Shift + F5 to view the latest file.
- Submit Assignment Pages
- The submit button is on each assignment page. Your assignment is not considered
done until you have completed the submission process and received confirmation
of your submission.
- If not already at your homepage:
i. Open
FireFox and navigate to: http://classes.winona.edu/<YearTerm + CourseID>/<UserName>/.
ii. Your ‘default.html’ webpage
should display.
iii. Navigate
to your Assignmentxx page.
iv. Make
sure that your assignment is completed. Check that screen shots display
properly, all answers are completed, and your name and assignment information
is filled in. If not, go back to Dreamweaver and complete or correct
any problems or errors.
v. When
you are satisfied with your assignment, click the Submit button to submit your
assignment.
vi. You
will see a confirmation page telling you that your assignment was submitted. There
will be a lot of other info on there that you probably will not understand – just
ignore. It is a good idea to save this confirmation page. Click
File>Save As…. Choose an appropriate folder to store these
pages. A possibility is D:\Data\<Course>\ConfirmationPages\
If instead of a confirmation page you see a warning or error message, then
your assignment did not submit and you will not receive credit for it. Save a
copy of the page containing the warning/error. If you cannot figure out what
went wrong (such as not being connected to the Internet), then email this page
to the instructor before the assignment is due. Make sure
the email subject line contains at least the course, section and wording "Assignment
Submission Problem".
vii. Click
on the Homepage hyperlink to go back to the professors's web site… or
click the Back icon in the menu to go back to yours.
- AssignmentInquiry – Review what assignment
you have already submitted and when it was submitted.
- On http://course1.winona.edu/ppaulson/ click
on Inquiry.
- You will need to enter your Last Name and your SID
Number.
- Press the ‘List Submissions!’ button.
- You will see what you submitted and when. This
is handy if you cannot remember what you have done so far for the class
or to make sure your assignment was turned in on time!
- Click on ‘Paulson’s Course1 Homepage’ to
return to Prof. Paulson’s site.
- Submit your URL – You
will use a FORM to do this.
- These steps need to be done only once at the start
of the semester. If for some reason you change the URL to your web
site (name change or submitting a new social security number will cause
a username change) make sure to notify your professor. See if they
want you to repeat this step.
- Using FireFox, navigate to the form used
to submit your URL to Professor Paulson- it is at http://course1.winona.edu/ppaulson/scripts/studentwebURL.htm
- The name of the form is Studentwebs Assignment Website
URL Submission Form.
- Fill out form with the term, campus, class, your last
name, your first name, your SID (also use the same SID for assignment and
attendance) and your website address. You will fill out this form
the normal way by just clicking in the fields and entering your information.
- Press the SUBMIT button.
- Your will receive a confirmation page telling you that
your website URL was submitted successfully. It will also tell you
the time and date you submitted it.
- Next make sure that the url that you submitted works by going to
the form shown below, entering your last name and SID, and then click
on 'Check URL'. Your assignment web site home page should be displayed. If
not, I cannot see it either, and there is a problem with your web site. You
must correct any problems!
http://course1.winona.edu/ppaulson/scripts/URLInquiry.htm
- URLInquiry – Confirm that your website URL has
been submitted correctly.
- On http://course1.winona.edu/ppaulson/ click
on URLInquiry.
- You will need to enter your Last Name and your SID
Number.
- Press ‘Get URL!’ button.
- You will see what you submitted and when. Check
to make sure information is correct. If you are in multiple
classes with Professor Paulson, information for all your web sites will
be listed.
- Click on Check URL in the Hyperlink column. This
should display your home directory for your web site. If you get a 'page not found' type of message there is something
wrong with the URL that you submitted. Recheck your information and resubmit your url. Or stop by Somsen 207 and ask one of the STARs for assistance. Or see Professor Paulson.
- Summary-Completing
Assignments-
Completing an assignment consists of the following steps.
- Making sure you have downloaded the assignment to your web
site. See Step 7.
- Complete the assignment. See steps 9,10, 11 and 12.
- Publish your
assignment. See step 13.
- Verifying your
assignment. See step 14.
- Submitting your assignment. See step 15 and 16.
- Recomnended care and maintenance-
- Add links to your browser toolbar to access your studentwebs site quicker.
- Make periodic backups of your web site to CD-R or CD-RW, DVD, or USB key or your personal network storage space.
- Create another web site to experiment with and learn about the technology (such as 'studentwebs')
----- Common Assignment Web Site Problems ------
- Wrong class/section- The most common mistake is that students do not change from the default
MIS999 class when submitting their url. See 17.d.
- Incorrect email hyperlink- Another common mistake is that students do not create the correct
email hyperlink on their assignment web site home page. See step 6.
- Change to username- If you obtain a new WSU network username (<UserName>) during the
semester, this can cause problems. Reciving a new network username will occur if you submit
a name change to WSU, or if you submit a social security number. If
you are going to do either, make sure to have a complete and accurate backup
copy of your web site. There can be problems accessing your new network
accounts and web site. Having a backup copy of the web site will allow
you to get your assignment web site installed at its new location very quickly
and conveniently. Please notify me of either of these events, because
I will have to change your assignment web site home page in my database.
- Exceed disk space- If you have had more than one class with me, or you publish a lot of materials to your studentwebs site, you may run out of web storage space. As a precaution only publish Assignment assignments to your web site. Do not use it for general purpose storage, otherwise you will exceed your disk quota. When this happens, you will no longer be able to connect and/or publish Assignment to the server. The error message that you receive will in no way reflect this fact, it is very ambiguous!
- Hard drive re-imaged- If your hard drive is re-imaged you may lose your Dreamweaver web site settings.You then must reconfigure your web site by repeating step 1.
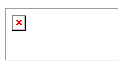
- Incorrect screen shot hyperlinks- If you see this image in either Dreamweaver, or while viewing your assignment page from the studentwebs server (NOT from your local machine), there is something wrong with the way you inserted the image into your page. Review step 10.
- Password change - If you see this message:
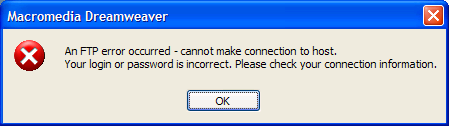
It is most likely because you recently changed your network password or username.
If you have changed your WSU network password you will not be able to publish any files to your studentwebs site until you update your password in Dreamweaver. To do this from the menu choose Site>Manage Sites... Select your web site from the list and then click 'Edit'. From the Advanced tab select 'Remote Info'. You will see this dialog box:
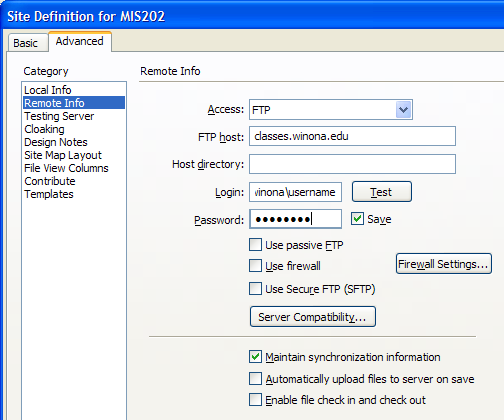
Type in your new password and/or login.
MAKE SURE YOU PUT 'winona/' IN FRONT OF YOUR LOGIN:
Press the 'Test' button and you will should see a message telling you that you have successfully connected to your web site.
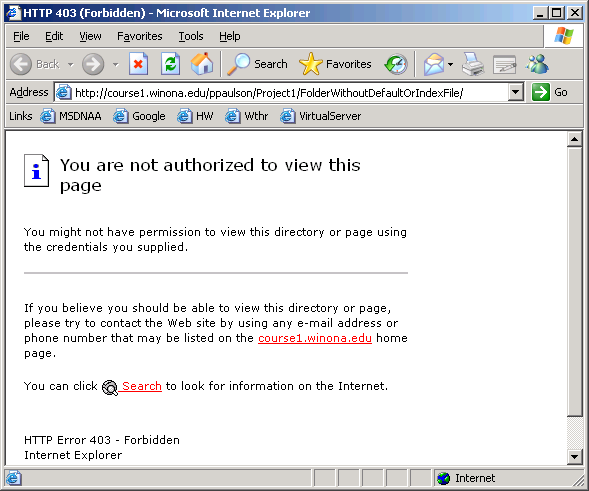
- Directory Listing Denied?-You hyperlinked to a folder and not to a file.
Check out the status bar in your browser.
If you hyperlinked to a folder, the file extension (.htm, .png) will not be displayed.
If you hyperlink to a folder which does not contain a file named index.htm or default.html (like your hompage), you will receive one of the following errors, depending on the browser you are using.
 IE6
IE6
 IE 7
IE 7
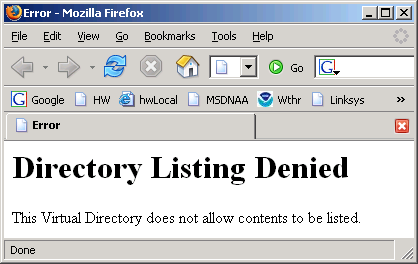 FireFox2
Try it, Click Here!
Solution: See step 11.i.
Make sure you are linking to a file-usually it will have an extension of .htm; but some assignments require you to link to .exe; .xls or other files.
Also note that you will not get this error if you link to a folder that contains a file named index.htm or default.html
Those files are automatically displayed instead.
Here is an example. default.html
- Page Note Found- Most likely there is an error in your file or path name.
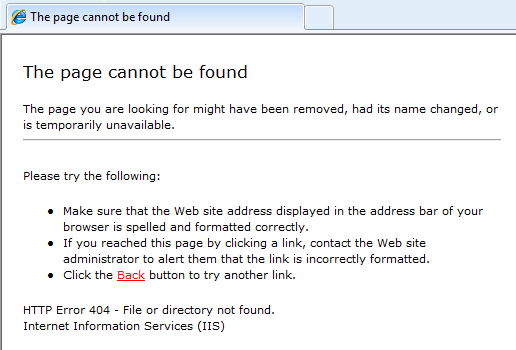 IE8
IE8
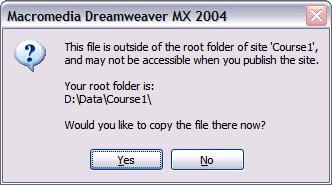
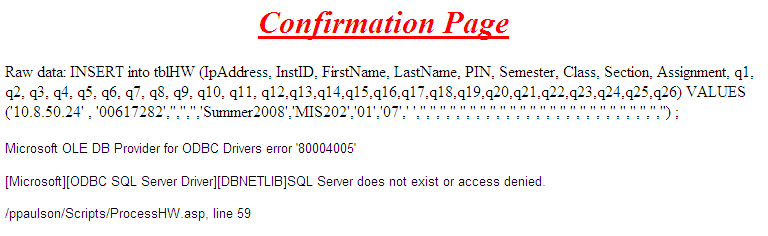
- Assignment Submission Problem- if you press the submit button and receive this message, there are network or server problems beyond your or my control.
Please send a copy of the message via email to alert me as soon as possible.
- JavaScript error:
If you get a pop up dialog box with the following error message delete the appropriate .dat file as detailed below:
While executing onLoad in_onOpen.htm, the following JavaScript error(s) occurred: In file "_onOpen": onOpen is not defined
(Delete the WinFileCache-7A9586CB.dat, MacFileCache-BFE7CE2E.dat, or FileCache.dat file from the Dreamweaver user configuration folder. It is recommended to delete the FileCache.dat file if you are experiencing a JavaScript error related to "dwscripts" or if you are receiving a "translators were not loaded" error message. The string of characters after "FileCache-" may differ on your machine. The location of the FileCache.dat file depends your operating system and your version of Dreamweaver. Note that on Windows, the Application Data and AppData folders are hidden by default, so verify that your Windows Explorer folder options are set to View Hidden Folders. )
Delete from Dreamweaver CS3 on Windows XP: C:\Documents and Settings\[username]\Application Data\Adobe\Dreamweaver 9\Configuration
- Dreamweaver cannot display the server folder error:
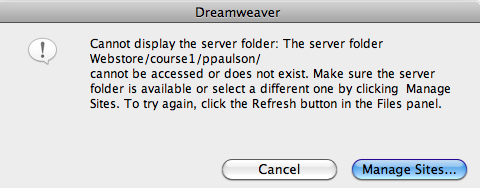
Please refer to this document, and use Finder to correct the network connectivity problem.